Loft Condensation
November 10, 2020by Martin StuartUncategorized
Loft Condensation
It’s that time of year again, folks!
Cool, damp autumn air – possibly combined with the fact that many people will soon be making their annual trip up to the loft to dig out Christmas decorations – means that November and December are when most of us will spot loft condensation.
This is a growing problem with increased insulation levels, so be particularly careful if you live in a modern, new-build house, or if you’ve recently added extra insulation to your loft.
Here’s what you need to know….
What’s the problem?
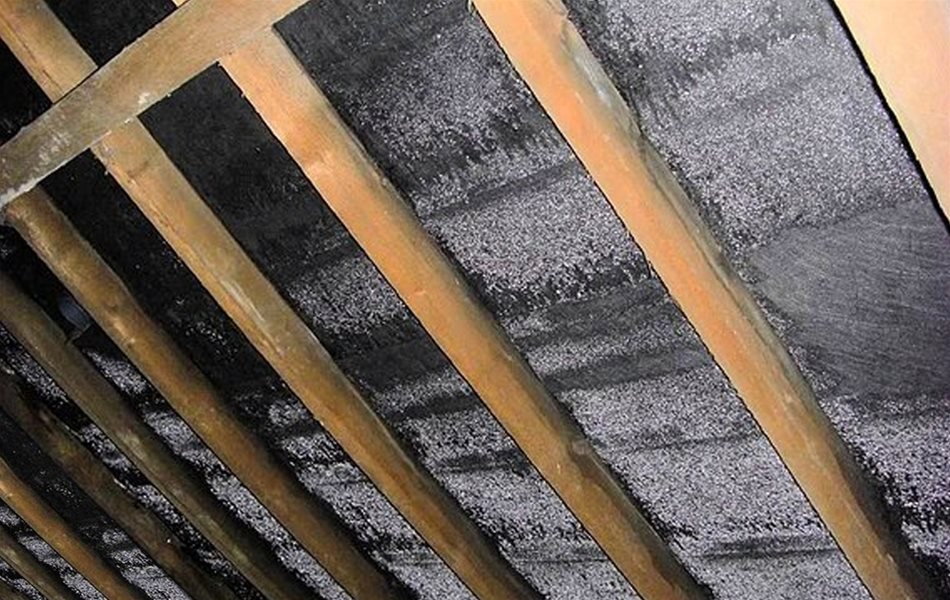
If you have a ‘cold’ roof – what we call a traditional loft space with insulation at ceiling level and an unheated, uninsulated space above it – condensation can form that soaks into the insulation. In serious cases, it can be bad enough to stain ceilings, cause roof timbers to rot and mould to grow on anything stored in the loft.
Why does it happen?
Warm air can hold more moisture than cold air – that’s why we get a dewfall at night as the air cools off after the sun has gone down. The same thing can happen in your loft, usually causing moisture to collect on the underside of the roofing felt/roof membrane and to drip off onto the insulation below, or to condense within the insulation itself. If you have absorbent loft insulation – like the common glassfibre quilt – this moisture soaks in and over a period of days or weeks gradually saturates the insulation.
Where does the moisture come from?
Two places, mainly:
- Traditionally, the problem is warm, moist air from inside the house leaking into the loft space. As it cooled on its way out – or if it came into contact with cold pipework or water tanks – the water vapour we’ve added to the air in our homes from cooking, bathing, laundry and even breathing can condense out as liquid moisture.
- In recent years, we’ve unwittingly added another problem: the extra insulation in our lofts means that there’s not as much heat leaking from the house below as there used to be. The air cools off at night so that it’s barely any warmer than the air outside, and a dew falls inside our loft, just like it does on the lawn!
There can also be more subtle and complicated effects, where the breeze flowing over the roof causes an invisible low-pressure ‘bubble’ to form over the lee slope of the roof, a bit like a very crude aeroplane wing. This low pressure causes cooling, which can increase condensation. On an aeroplane, it’s one of the reasons we see ‘con-trails’ (condensation trails) forming behind high-flying jet airliners. In your loft, you’ll see drips of water forming on the underside of the roof slope.
How do I check it?
This time of year – October through to December – is the worst period for loft condensation, so now is the time to keep an eye on things.
Ideally, go up into your loft first thing on a cool morning, before the sun has had chance to warm things up, and look for visible condensation (beads of moisture) on the underside of the roof slope, or on any exposed pipework or water tanks.
Prod your hand about in the loft insulation, to check if it feels damp.
How can I fix it?
This can be a bit trickier: first you’ve got to figure out what the source is (and bear in mind that sometimes there can be more than one!).
If it’s the ‘traditional’ source of warm air leaking out of the house, then the obvious solution is to stop those leaks – and the good news (kind of) is that you need to be doing this whatever the cause of your loft condensation, so it’s always a good place to start.
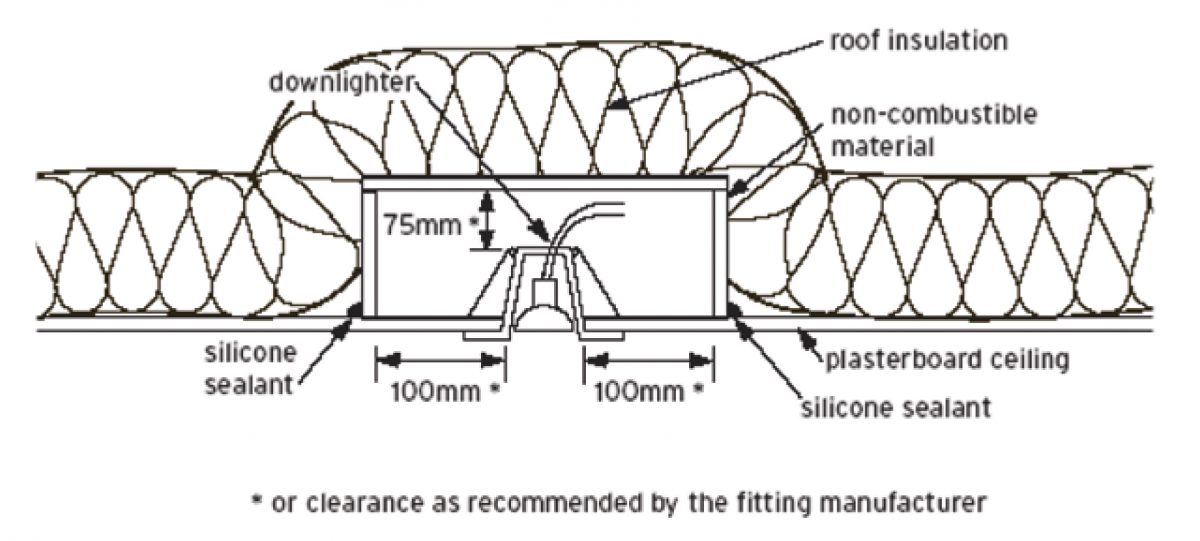
Make sure your loft hatch is well sealed and insulated, and that there are no unsealed penetrations through the ceiling around pipes, wiring or recessed downlights. The latter are a particular problem these days, especially since they’re often used over bathrooms or en suites, where internal moisture levels are particularly high. If you have recessed downlights, make sure they use a sealed box or hood as shown below (but it should be noted that standard ‘fire hoods’ are not likely to be suitable)
Next, make sure that all pipes and water tanks are properly lagged, so that moist air isn’t coming into contact with cold surfaces on plumbing.
Finally, make sure that your loft is properly ventilated. Most lofts with traditional roofing felt should be ventilated at the eaves, and you need to make sure that the air paths form these vents are not obstructed by insulation. Some modern roofs use vapour permeable roof membranes instead of traditional roofing felt, and theoretically these don’t need eaves ventilation (though the membrane can’t always cope in practice). If you’re not sure what your roof is, speak to an expert.
Storing things in your loft is not really a good idea and can also restrict airflow, but if you must do it, keep it to a minimum, and keep the stored items in the middle with plenty of space for airflow around them.
Even when you’ve done all that, if your loft is heavily insulated you may find that you still have problems. If you reach this point, it’s time to call the experts in, because some solutions that fix one problem will cause or exacerbate another… for example in some circumstances, increasing the ventilation levels will only make that aerodynamic cooling effect we mentioned earlier worse, because you’re just feeding an endless supply of damp air onto a surface that’s been cooled by the low pressure bubble created by the airflow over it!
The ultimate issue is that we’re now pushing the very limits of what will work in terms of insulation levels, on traditional ‘cold’ roof design, and as we push for ever more energy-efficient buildings, the future is likely to see a change to ‘warm’ roof construction (where there is no unheated, uninsulated loft space)… but that requires entirely different detailing and is not cheap or easy to apply to an existing roof.